Connecting Nodes
In the previous step of the tutorial, you started a program on CloudLab and provided it with some configuration arguments, but the program did not use those arguments. In this step, you'll use them to actually set up some distributed shared memory and coordinate among machines.
A Cleaner Starting Point
There are several fields of args that get accessed a lot. To start this step of the tutorial, re-create your code from the previous step, and then extract a few key arguments:
c++
#include <memory>
#include <remus/remus.h>
#include <vector>

int main(int argc, char **argv) {
  remus::INIT();

  // Configure and parse the arguments
  auto args = std::make_shared<remus::ArgMap>();
  args->import(remus::ARGS);
  args->parse(argc, argv);
  if (args->bget(remus::HELP)) {
    args->usage();
    return 0;
  }
  args->report_config();

  // Extract the args for determining names and roles
  uint64_t id = args->uget(remus::NODE_ID);
  uint64_t m0 = args->uget(remus::FIRST_MN_ID);
  uint64_t mn = args->uget(remus::LAST_MN_ID);
  uint64_t c0 = args->uget(remus::FIRST_CN_ID);
  uint64_t cn = args->uget(remus::LAST_CN_ID);
}
Machine Roles
In Remus programs, there are two different behaviors that a process / machine can perform. If the machine is a Memory Node, then it allocates memory and makes that memory available to other machines. If the machine is a Compute Node, then it is able to use the memory provided by the Memory Nodes.
A machine can also serve in both roles.
The distinction between these types of nodes is important. The role of Memory Node is a passive role: Memory Nodes do not have the ability to initiate any communication with other nodes, and cannot send messages to other nodes. They provide a region of memory that Compute Nodes can use to interact with each other. A Memory Node also can receive a small amount of information through the control block that is embedded at the root of each memory segment that it serves.
Topologies
The MN and CN arguments are used by Remus to create a network topology and connect machines. For simplicity, Remus refers to machines using unique numbers, starting with zero. A machine can serve as a Compute Node, a Memory Node, or both.
Remus has been tested in two configurations:
- Some machines are Memory Nodes and others are Compute Nodes
- All machines are both Memory Nodes and Compute Nodes
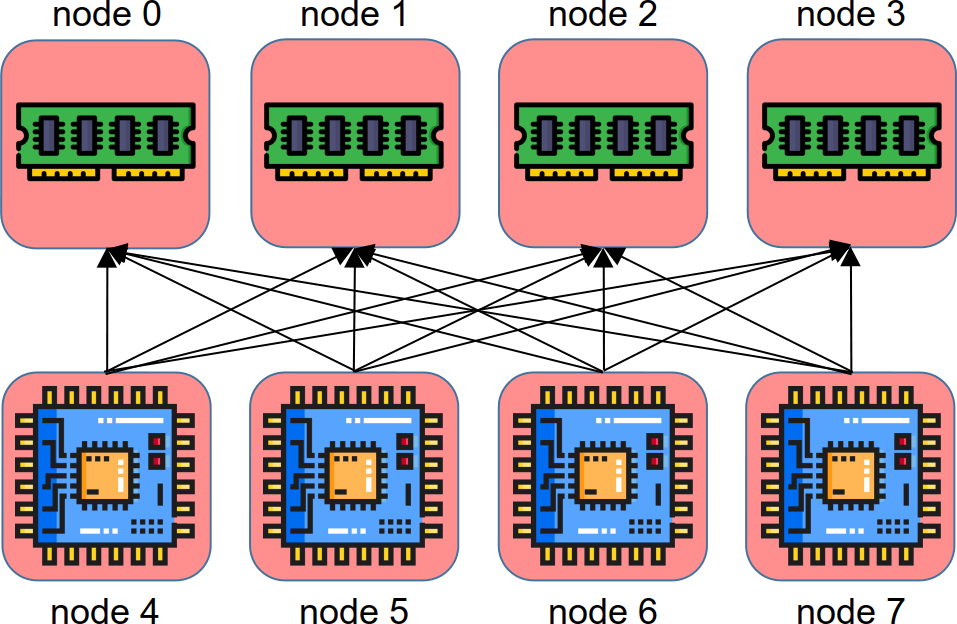
Remus uses the ARGS to do most of the set-up work automatically. Here is an example where there are eight available nodes, and the program was run with --first_mn_id 0 --last_mn_id 3 --first_cn_id 4 --last_cn_id 7:
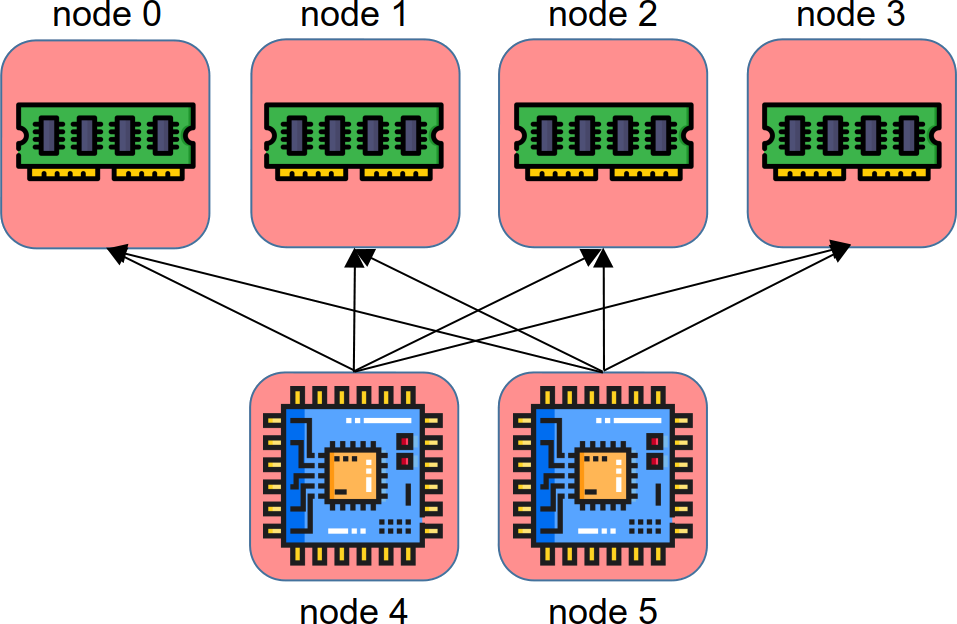
The number of Compute Nodes does not need to match the number of Memory Nodes. Here is an example with six available nodes, where four are Memory Nodes and two are Compute Nodes (--first_mn_id 0 --last_mn_id 3 --first_cn_id 4 --last_cn_id 5):
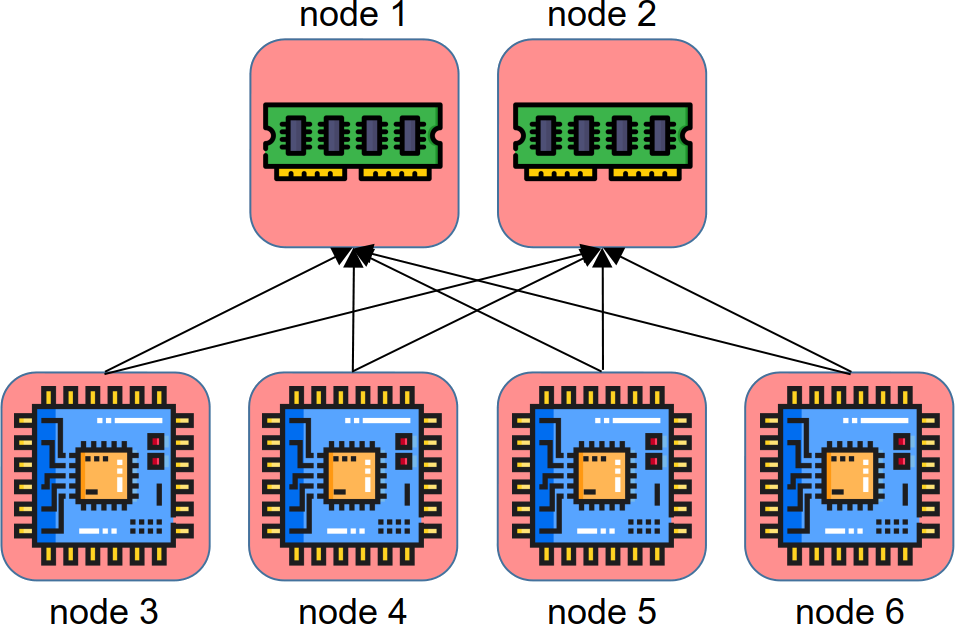
You might instead need lots of parallelism. Here is an example with six available nodes, where two are Memory Nodes and four are Compute Nodes (--first_mn_id 0 --last_mn_id 1 --first_cn_id 2 --last_cn_id 5):
Here is an example with four available nodes, all of which are serving as both Compute Nodes and Memory Nodes (--first_mn_id 0 --last_mn_id 3 --first_cn_id 0 --last_cn_id 3): 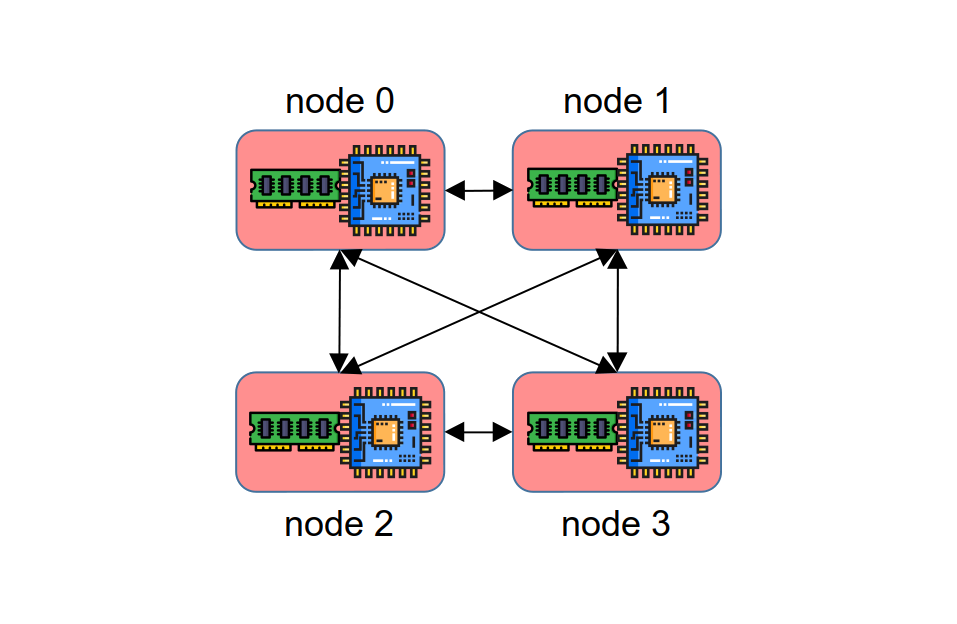
You should feel free to try out different configurations, but as you do, please note the following requirements:
- There must always be at least one Compute Node and at least one Memory Node
- The numerical ranges for Compute Nodes and for Memory Nodes must be contiguous
- Memory Nodes should not have larger numbers than Compute Nodes
TIP
These requirements may be relaxed in a later version of Remus
Converting Names
Remus uses numerical indices to refer to machines. This works seamlessly with CloudLab, but may require extra support for other clusters. To prevent programs from being too tightly coupled to CloudLab, the translation from indices to DNS names is not built into Remus. For CloudLab, where the translation is easy, you'll want to include the benchmark/cloudlab.h file, which provides the id_to_dns_name function:
c++
#include "cloudlab.h"Using this function and the m0 and mn arguments to the program, you can compute the DNS names of the machines that will serve as Memory Nodes:
c++
  // prepare network information about this machine and about memnodes
  std::vector<remus::MachineInfo> memnodes;
  for (uint64_t i = m0; i <= mn; ++i) {
    memnodes.emplace_back(i, id_to_dns_name(i));
  }
Every node (whether a Memory Node or a Compute Node) will also need to know its specific numerical identifier:
c++
  // Compute the name of this machine
  remus::MachineInfo self(id, id_to_dns_name(id));
TIP
If you run on a system other than CloudLab, you'll probably want to use a second ARGS object to provide the information needed to implement your own id_to_dns_name() function.
Setting Up Memory Nodes
A process might serve as a Memory Node, a Compute Node, or both. When a process has both roles, it's important that Memory Node configuration comes first:
c++
  // Configure as a MemoryNode?
  std::unique_ptr<remus::MemoryNode> memory_node;
  if (id >= m0 && id <= mn) {
    // Make the pools, await connections
    memory_node.reset(new remus::MemoryNode(self, args));
  }
Within the MemoryNode constructor, the SEGS_PER_MN and SEG_SIZE flags will be used to allocate distributed shared memory. The product of these two arguments determines the total amount of memory that a MemoryNode will share. There are two reasons why Remus allocates several segments, instead of just one:
- On some systems, there is a maximum size for each allocation (for example, CloudLab's r320 machines may behave erratically when segments are larger than
). - In some applications, dedicating one segment to each program thread can give better performance.
TIP
It is best to enable "huge page" support on your system, and to ensure that each segment is a multiple of the huge page size.
Similarly, sometimes it is advantageous to have more than one connection between a ComputeNode and a MemoryNode. The --qp-lanes flag determines how many connections will be made from each ComputeNode to each MemoryNode.
Once all memory is allocated and registered with the RDMA network card, the MemoryNode will start listening on the MN_PORT port until it has received QP_LANES connections from each ComputeNode other than itself. This listening happens on a separate thread, so that a machine can be both a MemoryNode and a ComputeNode. When a machine is both a ComputeNode and a MemoryNode, it leverages the loopback device to create connections to itself.
Setting Up Compute Nodes
After possibly configuring the process as a Memory Node, it's time to set it up as a Compute Node:
c++
  // Configure as a ComputeNode?
  std::shared_ptr<remus::ComputeNode> compute_node;
  if (id >= c0 && id <= cn) {
    compute_node.reset(new remus::ComputeNode(self, args));
    // NB:  If this ComputeNode is also a MemoryNode, then we need to pass the
    //      rkeys to the local MemoryNode.  There's no harm in doing them first.
    if (memory_node.get() != nullptr) {
      compute_node->connect_local(memnodes, memory_node->get_local_rkeys());
    }
    compute_node->connect_remote(memnodes);
  }
The ComputeNode constructor uses the CN_THREAD_BUFSZ argument to create a region of memory that it carves up and will allocate among threads, so they have a place to stage data when interacting with remote machines.
In addition to creating the ComputeNode, this code block reaches out and connects to each MemoryNode. It turns out that connecting to localhost is complicated, so the code has a special process for handling it. In particular, the process needs to know the "rkeys" (remote keys) for addressing the Memory Node's segments.
Finishing Network Set-Up
In general, it's not good to keep threads running, even if they're idle or blocked. When all Compute Nodes have finished connecting to the Memory Node, you should immediately instruct the Memory Node to stop its listening thread:
c++
  // Reclaim threads when all connections have been made
  if (memory_node) {
    memory_node->init_done();
  }
At this point, the network is fully configured. From here, your Compute Nodes could start making Compute Threads and interacting through the Memory Nodes' shared memory.
Graceful Shut Down
If you were to run the program right now, the Memory Nodes would never terminate. You can test this by typing:
bash
./cl.sh local/my_config build-run local/my_experimentTo recover from this situation, you'll need to press ctrl-c in each screen. Then use ./cl.sh local/my_config connect to connect to your allocated machines, and type killall hello in each screen.
The problem is that the Memory Node destructor waits until it has received a shutdown notification from every Compute Thread. These notifications happen automatically in the ComputeThread destructor. So, to put it simply, you'll need to create a bunch of ComputeThread objects and then let them destruct. You don't even need to make real threads here or assign those threads ComputeThread objects: it's enough to just make the objects and let them destruct:
c++
  // Create Compute Threads, so they can signal to the Memory Nodes that
  // they've completed
  if (id >= c0 && id <= cn) {
    std::vector<std::shared_ptr<remus::ComputeThread>> compute_threads;
    for (uint64_t i = 0; i < args->uget(remus::CN_THREADS); ++i) {
      compute_threads.push_back(
          std::make_shared<remus::ComputeThread>(id, compute_node, args));
    }
  }
Now is a good time to test your program with different configurations. In addition to my_experiment, which has two Memory Nodes and one Compute Node, try running with three nodes that are both Memory Nodes and Compute Nodes. Rename local/my_experiment to local/m2_c1_mc0. Then create local/m0_c0_mc3:
bash
exefile=build/benchmark/hello
experiment_args="--seg-size 29 --segs-per-mn 2 --first-cn-id 0 --last-cn-id 2 --first-mn-id 0 --last-mn-id 2 --qp-lanes 2 --qp-sched-pol RR --mn-port 33330 --cn-threads 2 --cn-ops-per-thread 4 --cn-thread-bufsz 20 --alloc-pol GLOBAL-RR"
When you run with either of these configurations, you should see messages like "Registered region", "Connecting to remote machine", and "ComputeThread shutdown" on the Compute nodes, and "MemoryNode shutdown" on the Memory Nodes.
Feel free to experiment with different numbers of QP lanes, segment sizes, and segments per node.
WARNING
CloudLab limits the total amount of RNIC-registered memory to a small number of gigabytes, so choose seg-size and segs-per-mn carefully.
The Anatomy Of A Segment
To understand how graceful shut-down works, note that Remus reserves the first 64 bytes of each segment for control data. The general layout appears below:
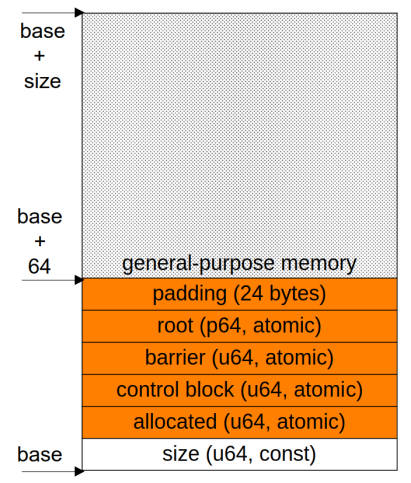
The size and allocated fields are used by every segment, on every Memory Node, to enable Remus to allocate memory from each segment, just like malloc and free. For now, only the barrier in segment 0 of Memory Node 0 is used. It is used as a simple, sense-reversing barrier. It is helpful for global synchronization, e.g., to ensure that all threads reach one milestone before any progresses to the next. The control block is used by Remus to shut down Memory Nodes at the end of the program. Lastly, the root is a generic pointer to distributed memory (and as with barrier, Remus currently only uses the root in segment 0 of Memory Node 0).
To understand how these fields are used, keep in mind that a distributed program typically needs to tame some of its asynchrony. You cannot predict when each process will start, or when it will reach a specific point in its execution. Some of the challenges a program faces are:
- When can threads start accessing distributed memory?
- How can Memory Nodes know when it's time to shut down?
- How can threads find the data they're going to access?
When a Compute Node starts, it tries to connect to every Memory Node before it tries to access any memory. This addresses the first challenge, because Memory Nodes initialize themselves before they listen for connections, and Compute Nodes do not start using the memory until they've created connections. Thus all Memory Nodes will be initialized.
To address the second problem, Remus uses the control block. Compute Threads increment the control block of segment 0 on each Memory Node when they destruct, and Memory Nodes do not shut down until they see that all Compute Threads have shut down.
This leaves the third problem. To solve it, Remus uses the barrier and root pointer. After Compute Nodes create all of their Compute Threads, those threads should wait at a barrier. This ensures that all threads are initialized before the program starts doing anything that might require threads to interact. Before reaching the barrier, exactly one thread could allocate and initialize memory from a segment, and then write that memory's address to the root pointer of segment 0, memory node 0. In this way, after the barrier all threads will be able to reach the same data through the root pointer.
In more advanced programs, the following sequence is common:
- One thread sets the root to point to some empty data structures
- All threads synchronize at a barrier
- Many threads use the root to create the initial state of the data structures
- All threads synchronize at a barrier
- All threads start using the data structures to do the work of the program
- All threads synchronize at a barrier
- Destructors run and the program shuts down gracefully
